Striping Kit
Zero-Turn-Radius Riding Mower with 54in/60in Cutting Unit
Model No. 140-5161-Serial No. and Up
Installation
Removing the Mower Deck
- Park the machine on a level surface, disengage the blade-control switch, and engage the parking brake.
- Shut off the engine, remove the key, and wait for all moving parts to stop before leaving the operating position.
- Remove the mower deck from the machine. Refer to the Removing the Mower section in the Operator's Manual or the appropriate section of the Service Manual.
Warning
The belt tension spring is under tension when installed and can cause personal injury. Be careful when removing the mower belt and deck.
Installing the Striping Kit
For 54-inch Mower Decks
Parts needed for this procedure:
| Striping bracket | 1 |
| Washer-head screw (5/16 x 1/2 inch, self-threading) | 2 |
| Flat washer (5/16 inch) | 2 |
| Wiper | 1 |
| Hex-head screw (1/4 x 3/4 inch) | 8 |
| Washer | 8 |
| Speed nut | 8 |
Installing the Striping Bracket
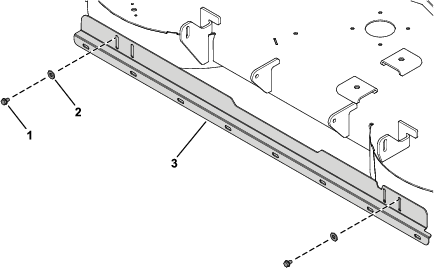
- Using the striping bracket as the template, drill 2 holes (9/32 inch) into the mower deck using the dimensions shown in Figure 1.

- 45 mm (1-3/4 inches)
- 153 mm (6 inches)

- Washer-head screw (5/16 x 1/2 inch, self-threading)
- Flat washer (5/16 inch)
- Striping bracket
Installing the Wiper
- Cut the wiper at the notches as shown in Figure 3.

- Wiper
- Cut here at the notches.
- Hex-head screw (1/4 x 3/4 inch)
- Washer
- Wiper
- Speed nut
- Striping bracket
Installing the Striping Kit
For 60-inch Mower Decks
Parts needed for this procedure:
| Striping bracket | 1 |
| Washer-head screw (5/16 x 1/2 inch, self-threading) | 2 |
| Flat washer (5/16 inch) | 2 |
| Wiper | 1 |
| Hex-head screw (1/4 x 3/4 inch) | 8 |
| Washer | 8 |
| Speed nut | 8 |
Installing the Striping Bracket
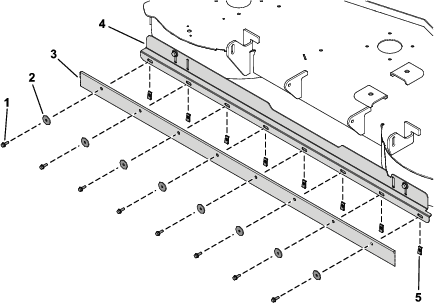
- Using the striping bracket as the template, drill 2 holes (9/32 inch) into the mower deck using the dimensions shown in Figure 5.

- 45 mm (1-3/4 inches)
- 211 mm (8-5/16 inches)
- Washer-head screw (5/16 x 1/2 inch, self-threading)
- Flat washer (5/16 inch)
- Striping bracket
Installing the Wiper
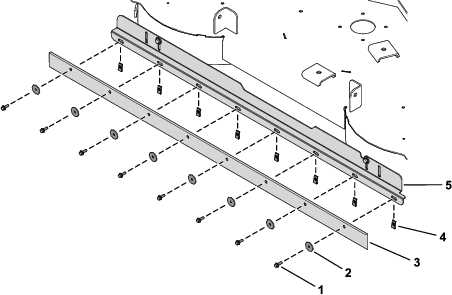
- Install the 8 speed nuts onto the striping bracket (Figure 7).
- Secure the wiper to striping bracket and speed nuts using 8 hex-head screws (1/4 x 3/4 inch) and 8 washers (Figure 7).
- Hex-head screw (1/4 x 3/4 inch)
- Washer
- Wiper
- Striping bracket
- Speed nut
Installing the Mower Deck
Note: Squealing when the belt is rotating, blades slipping when cutting grass, frayed belt edges, burn marks, and cracks are signs of a worn mower belt. Replace the mower belt if any of these conditions are evident.
Install the mower belt (Figure 8), if removed. Refer to the Replacing the Mower Belt section in the Operator's Manual.
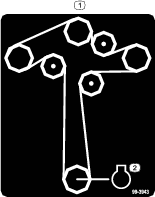
Figure 8
Operation
Adjusting the Striping Height
To change the striping effect of the mower deck, raise or lower the wiper height by adjusting the striping bracket position. For best results, set the bottom edge of the wiper to 6 to 13 mm (1/4 to 1/2 inch) below the bottom of the deck (Figure 9).
Important: Applying excessive downward pressure with the striping bracket may damage turf and the striping kit.
Important: To avoid damage to landscaping and the striping bracket, avoid close trimming with the striping kit installed. Replace the wiper yearly, or more often as wear requires.
Important: Avoid obstacles that can damage the kit. Temporarily lift the deck to the transport position when performing turns or moving in reverse.
Important: Raise the mower deck with the striping kit installed to the transport position when not in use to avoid damaging the wiper.
- Park the machine on a level surface, disengage the blade-control switch, and engage the parking brake.
- Shut off the engine, remove the key, and wait for all moving parts to stop before leaving the operating position.
- Loosen the 2 washer-head screws (self-threading) that secure the striping bracket (Figure 9).
- Adjust the striping bracket position as follows:
- Increase the striping effect by lowering the striping bracket until the desired striping effect is attained (Figure 9).
- Decrease the striping effect by raising the striping bracket until the desired striping effect is attained (Figure 9).
- Ensure the striping bracket is adjusted level to the ground.
- Tighten the 2 washer-head screws (self-threading) that secure the striping bracket (Figure 9).
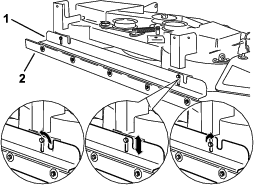
Figure 9
Striping Height Adjustment
- Striping bracket
- Wiper
