There might be affiliate links in this post. Buying through them can earn us a small commission at no cost to you. This covers our wages and keeps our resources free to use.
Last Updated on: October 2, 2023Learning and knowing your welding symbols well is equally important as learning to weld properly.
Unfortunately, we still have some welding professionals who are not familiar with the welding symbol chart.
Some people think that just knowing the welding process is enough. It might be for amateurs, but professional welders have to have exact knowledge about welding symbols. If your goal is to become a pro one day (read bigger salary!), then you better sit down and study. We break down all the important pieces about this topic right here.
This is a Massive article with well over 4000 words, over 50 subheadings, and symbol drawings. While I highly recommend you read it all and see all of the images, here is a handy small table of contents that links to the top sections of the article: If you don’t have the time or you don’t have an internet connection at your workplace you have a free downloadable PDF file (e-book) with all the welding symbols and their short explanation.
Just a small side note. I drew all of the drawings myself in vector-based software. Production of this article took a long time and if you decide to take an image and upload it on your website please add a link back with a source to this original article. Thank you.

Subscribe: Get FREE 30 page PDF Welding Symbols Chart With Applied Examples for Each Symbol!
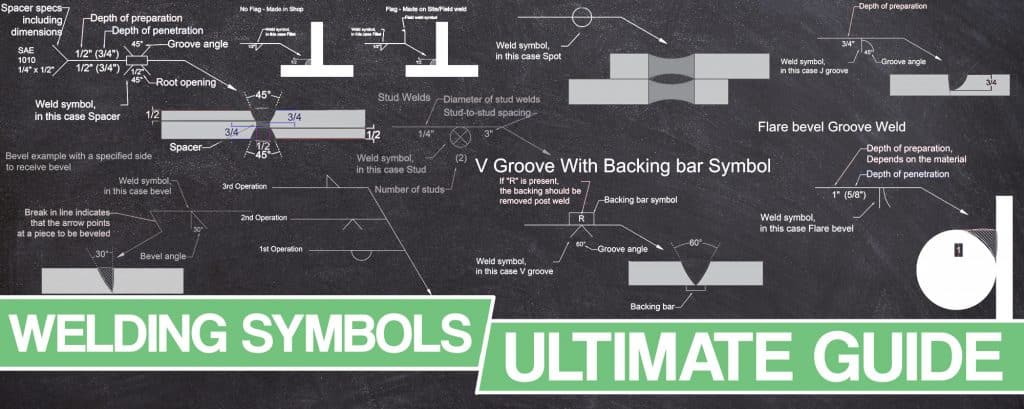
Learning all the welding symbols may be hard as there are a lot of them. However, you should know how to read a welding chart as it is much more important than trying to memorize all of them by heart. The most important symbols that you do have to memorize are the fillet weld symbol and the groove weld symbol.
You are more than likely going to come across welds on engineering and fabrication drawings. These are a set of symbols that describe the weld, the weld leg size, as well as giving processing and finishing information. The joint is the basis for reference for welding symbols.
The complete set of welding symbols is published by the American National Standards Institute (ANSI) and the American Welding Society (AWS).
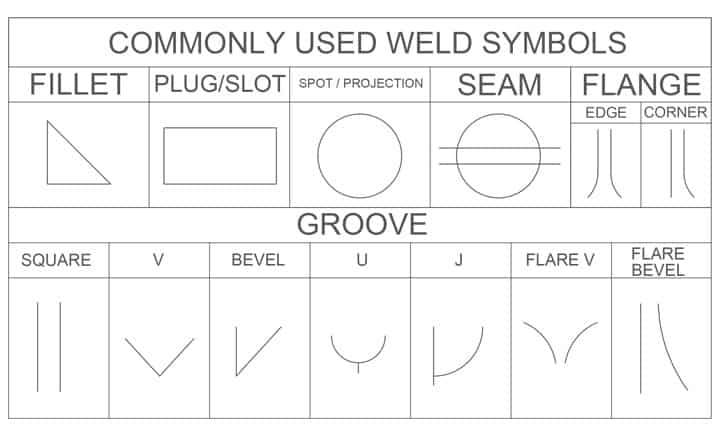
Elementary symbols are usually added to the reference line. Their purpose is to indicate the type of weld. You can usually find them marked at the midpoint.
These symbols are combined so as to convey certain configurations. If the symbols are not clear enough, meaning that they cannot provide the information needed, there may be a drawing of the cross-section of the weld with its dimensions. Symbols for double-sided butt welds are drawn on the opposite side of each other.
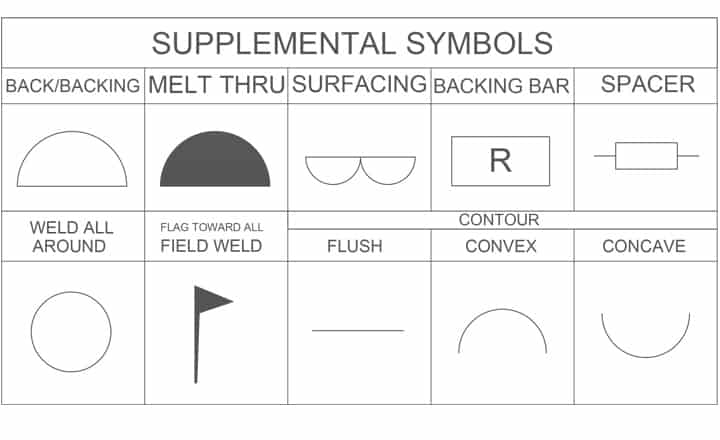
Complementary symbols exist as additional information. Their purpose is to add info about something like the shape of the basic weld and how it should be made.
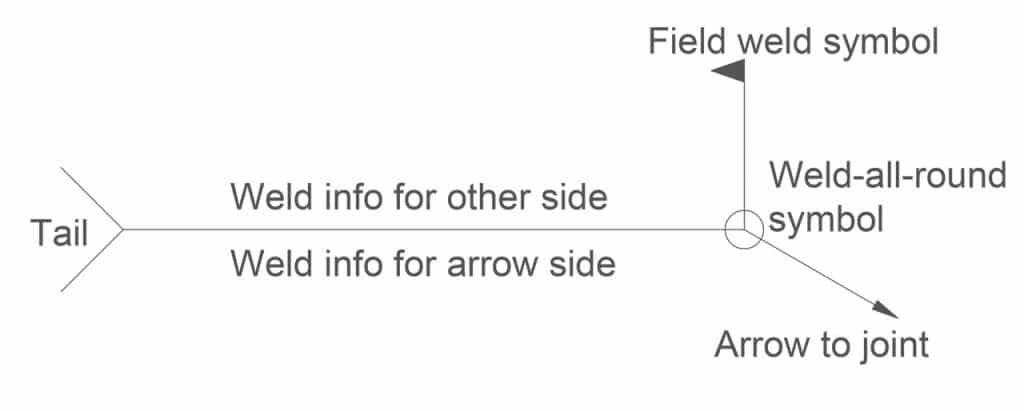
Weld symbols come with an arrow that points to the direction of the drawing where a weld needs to be made. The arrow line is connected to a leader line which is intersected with a horizontal reference line.
You can also find a tail at the opposite end of the reference line which then branches off in two different directions. The tail is an optional element.
The arrow is the main element of weld symbols. The arrow line points towards the place that is supposed to be welded. The stem of the arrow should not be depicted as a horizontal line on the drawing.
Being that welding symbols specify the joint that the arrow side is pointing towards as well as a change of direction and a change of geometry of the end of the joint a multiple arrow welding symbol can be added.
Reference lines are important welding symbols drawn as a straight line horizontally across the drawing. The reference line arrow also contains additional details about the welding itself. It can contain some valuable information like the joint design, the weld pattern, the weld size, etc.
Both the upper and the lower reference line have the same elements for both sides. The main difference is the info about where one actually needs to weld. The lower part is a narrow side where the arrow indicates what side to weld based on the provided elements. The elements given on the upper part describe the other side of the joint.
This info is very useful when each side comes with different details of the joint. Also, it helps to diminish the usage of too many welding symbols in one joint.
The tail is the third weld symbol part. It is drawn at the end of the reference line opposite the arrow. It usually contains information for which there is no provision elsewhere. The tail can provide info about the welding process, the reference document, and the examination process.
However, the tail doesn’t have to be there, it depends on the need for additional information. If provisional info is not relevant, the tail is omitted.

The above image shows how a typical welding symbol may be constructed. This may differ a bit from region to region but this is the way it is done most of the time. This graph is the most important one to have on you when reading the symbols or to memorize what each of its parts means. In time you will memorize all of it and it will be like second nature to you.Now, let’s see what all of the above-shown elements mean: